I’m trying an experiment: I’m moving Bad Etchings over to its own space on Blogger. This will allow me to post semi-anonymously and therefore craft captions more ribald than I am willing to do here.
Set your bookmarks to badetchings.blogspot.com, and be sure to subscribe so you don’t have to remember to go check it.
First of all, apologies for not really blogging. Events have all conspired against me blah blah blah. I hope the Bad Etchings have entertained you in the meantime.
Recently on Facebook I did one of those challenges where I listed ten books that have impacted me. Today, as I was working on sashes for the four Old Men skirts, I was reminded of one that truly changed my life, one that didn’t occur to me while making the list because its lessons are so deeply embedded in me that it never surfaces for trivial things like the Facebook list.
That book is Cheaper by the Dozen, by siblings Frank B. Gilbreth and Ernestine Gilbreth Carey. The movie is irrelevant, and in fact I don’t much remember the charming shenanigans of the Gilbreth family in the book. What I do remember is what their parents did for a living: both mother and father were famous efficiency experts, and what they discovered through their motion studies in factories changed my life forever.
Put in its simplest form, it’s this: if you have a multistep task that you have to do repeatedly—as most factories have to do to assemble their products—then you perform each subtask of the final task all at the same time before moving to the next subtask.
So with my six sashes, I cut all the monks cloth panels first, then serged all six, then cut all six colored linings, then marked them, etc.
At the turn of the last century, as America geared up to become the industrial powerhouse it became, the Gilbreths played a key role. We already knew about standardizing parts, but we were still in craftsman mode. Even in the new automobile industry, we were apt to have crews who assembled the whole car from start to finish.
The Gilbreths changed that. They showed to the way to Ford’s assembly line; as the great man says in Ragtime,
Even people who ain’t too clever
Can learn to tighten
A nut forever,
Attach one pedal
Or pull one lever
(source: http://www.lyricsondemand.com/)
And so on we moved.
The main way it makes the individual craftsman more efficient is that you’re not always shifting mental gears for the next subtask. Instead, you can settle into the rhythm of pinning the monks cloth to the lining, for example, and then once that’s done, set up the new rhythm of basting the two pieces together. And so on I moved.
The other major strategy I got from the Gilbreths—and which I do remember played some part in the hilarity of the book—is arranging your parts and pieces so that they are 1) within easy reach; and 2) in the same order that you’re going to need them. I can’t tell you how many times I have caught myself in some project or other reaching across myself or the product to pick up something I needed. I almost always stop myself and rearrange my workspace. I hope that the Gilbreths would approve.
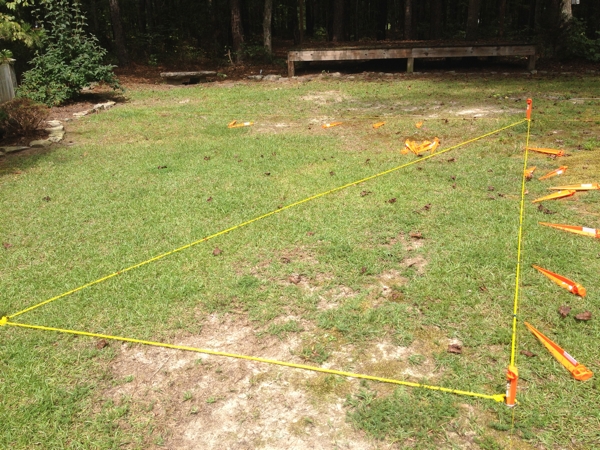
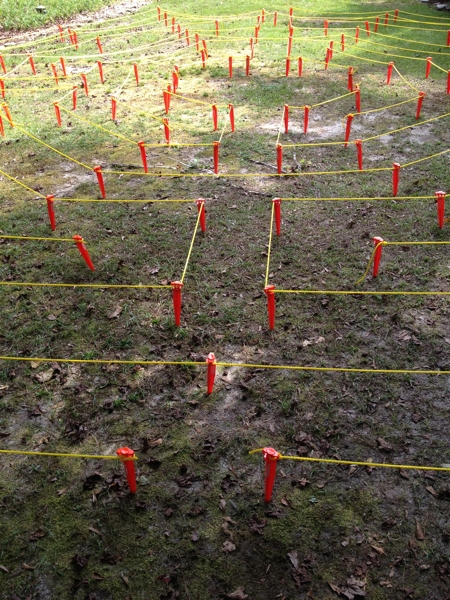
Last Saturday, members of the 3 Old Men ritual troupe met to assemble the labyrinth for the first time and to run through the ritual. I am drawing a discreet curtain over our experience—sometimes you, dear reader, need to encounter the sacred directly and not through my reportage—but I would like to show you the labyrinth.
You will recall that I had designed an octagonal labyrinth with four entrances, to be made of 144 tent stakes and about 1000 feet of rope. You may also recall that I designed the method by which we would lay this out, by using a triangle of rope like the Egyptians.
And you know what? It worked.
Here’s our Egyptian triangle:
Staked to the center, the ropes form a right triangle when pulled tight, creating a 22.5° arc at the center. The two long ropes are marked, indicating where the stakes are to be driven (with a few variances).
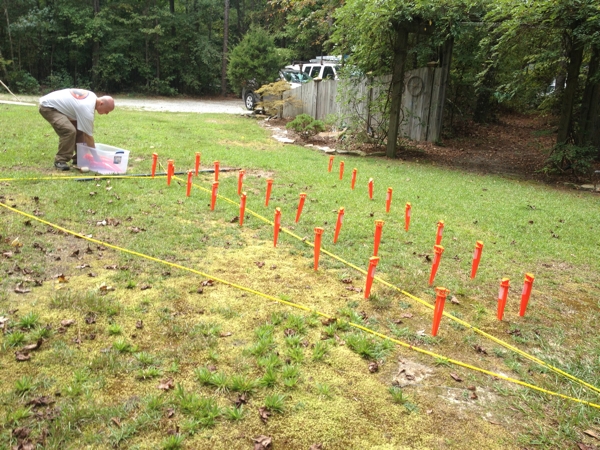
Here’s that in action:
Give or take a couple of boneheaded mistakes—missing an outer stake, not taking the long ropes all the way to their last stake, that kind of thing—it worked beautifully.
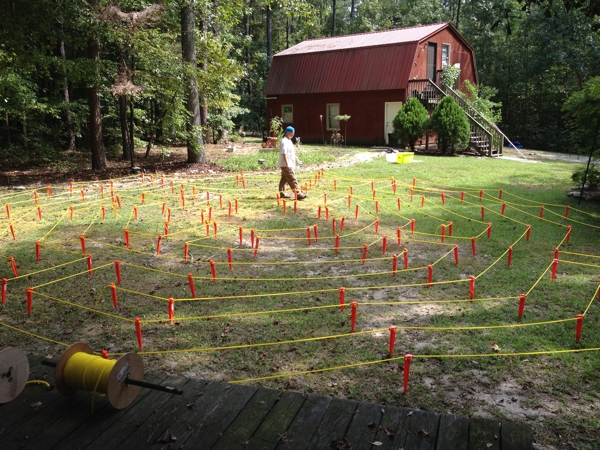
Look:
It’s going to be a wonderful thing we’re doing at Alchemy and, next year, at Burning Man. I’ll talk more later about the actual experience of walking this particular labyrinth.
So I rebuilt the sashes, and they work much better.
The new layout:
I laboriously cut the monks cloth along the weave, serged the edges, and basted it onto the lining.
I gave myself a broader strip in which to enclose the piping.
Et voilà!
They’re much cleaner with no loose edges to torment me.
In other news, I took a deep breath and finished the waistband and attached it to the skirt. I’m all done except the center back seam, which I will do today.
However.
I pinned together the waistband in the back and tried the thing on. I am not at all pleased with the results. The waistband is a marvelously beautiful piece of work, but it’s too bulky. I’m going to have to play with it more, especially this weekend when the Old Men meet to put together the labyrinth for the first time and test drive the ritual.
And no, I am not posting photos of the skirt in situ, as it were. You will have to attend a Burn to see that.
update, 9/12/14: After working with a couple of entirely new designs, I revisited my finished skirt and decided to try just cutting off the top three inches of the waistband, i.e., the floppy, un-rollable mess. Et voilà, it worked. The result is clunky in a really groovy neo-Phoenician way. I think the team is going to approve.
It’s awfully useful being a polymath, don’t you think? For example, once you understand that a doughnut is the same as a coffee mug, then it’s just a short jump to sewing.
Because one thing that fascinates me about costuming was how you can take a variety of oddly shaped and definitely flat pieces of fabric…
…and turn them into…
It has never failed to amaze me.
So it’s a good thing that I have a spatially oriented science-fu brain, because today nearly drove me around the bend. I can’t imagine trying to figure this out without a lifetime of watching spheres turn inside out.
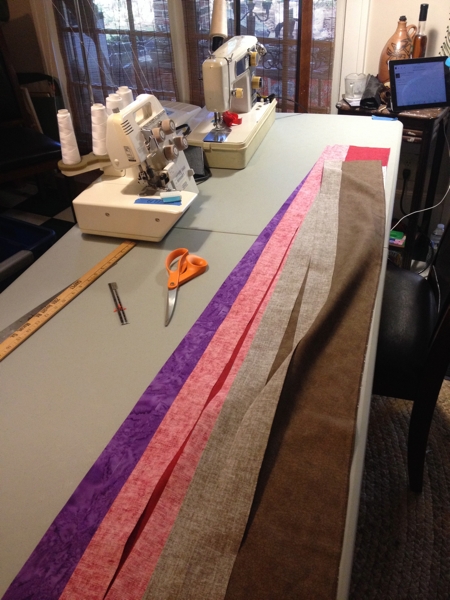
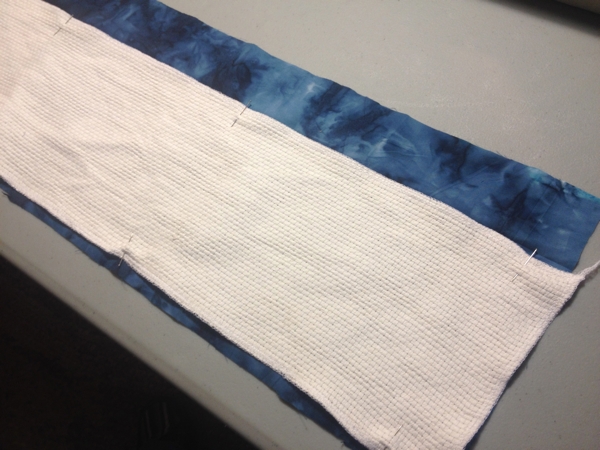
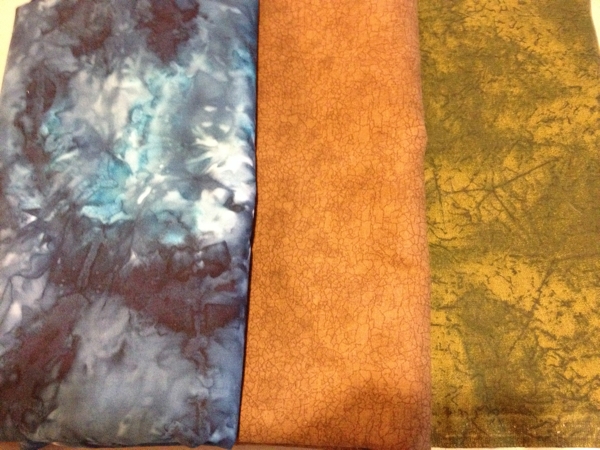
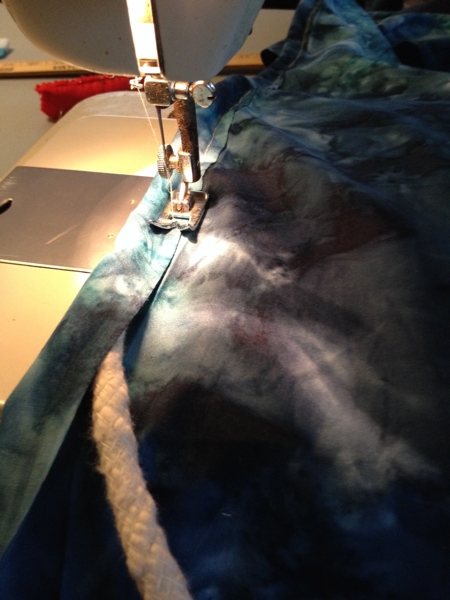
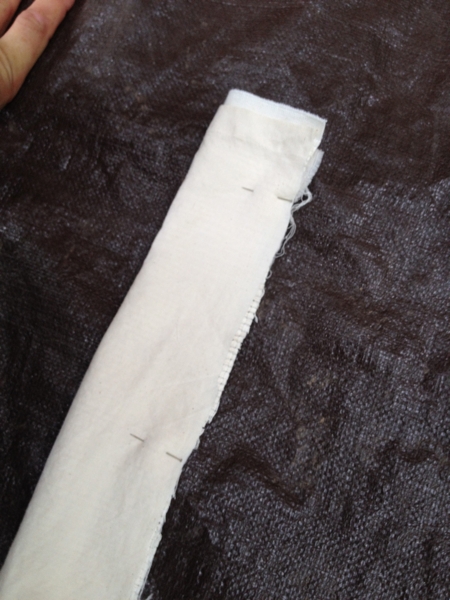
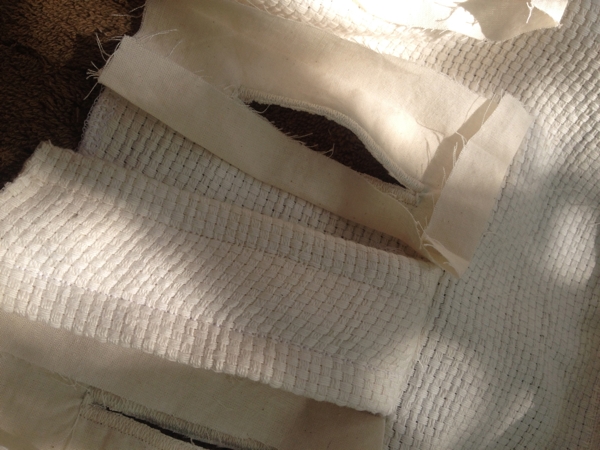
I was working on the sashes for the waistband. The hard part was that we—and by that I mean Craig—decided that we needed a strip of color on the sashes. That means covered piping, plus a lining to give the monks cloth enough body to survive being tied repeatedly.
Here are three of the four colors:
Here’s what makes this hard: the sash is sewed as a tube, then turned inside out. (See the belt loops for a simpler example.) That means you have to figure out how to enclose the piping along the seam so that when you turn the whole thing inside out, you get a flat sash with the colored piping emerging from the seam.
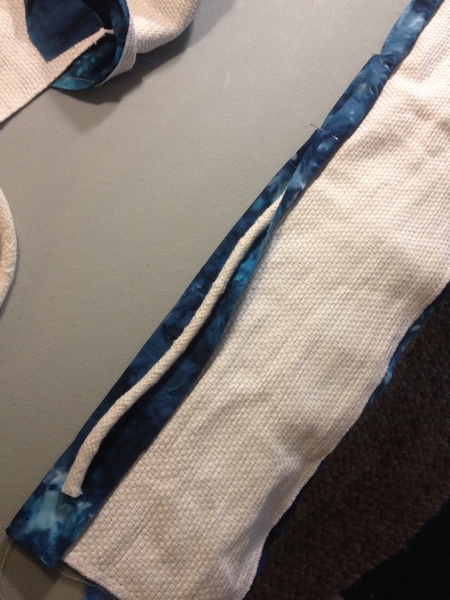
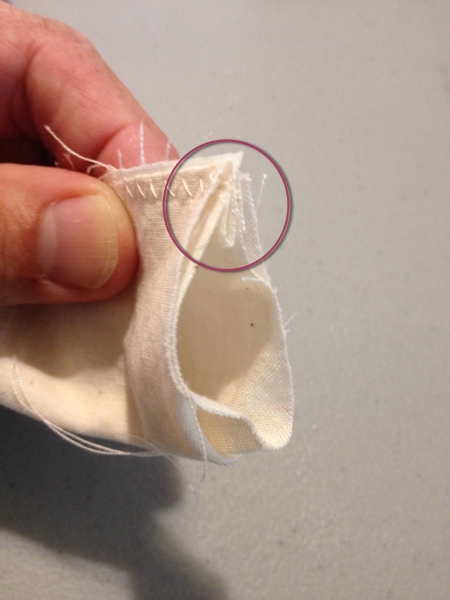
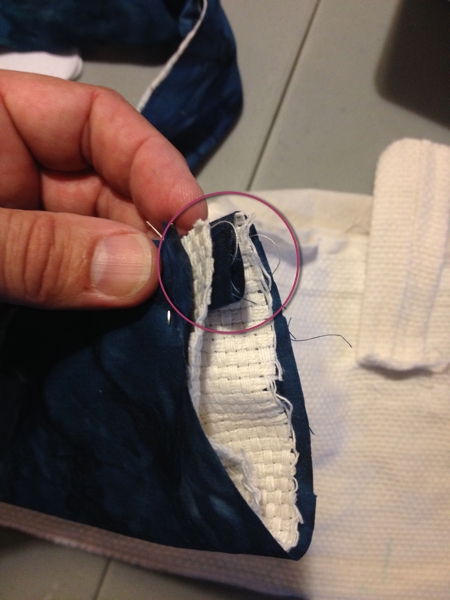
I sketched some possibilities, but mentally I knew they wouldn’t reverse properly. Finally I had to build a prototype out of muslin:
See the circled part? That’s the casing for the piping. [N.B.: Jobie is not allowed to comment on this photo.]
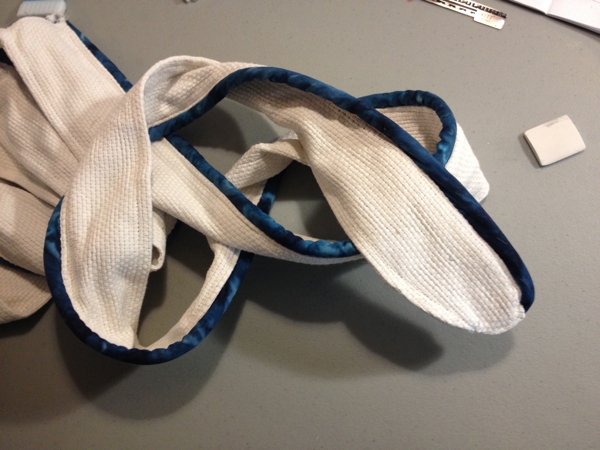
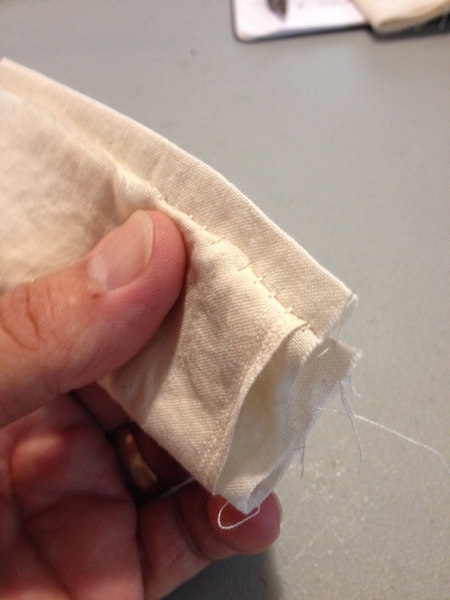
When you turn this inside out, it looks like this:
So that works.
First step is to baste the piping into its casing:
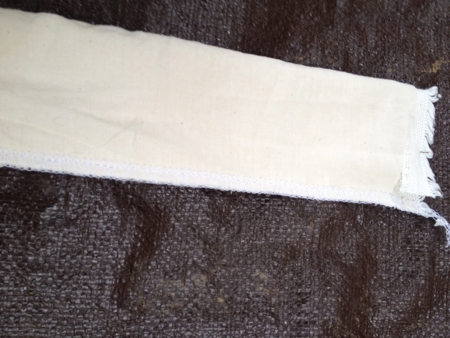
Then apparently magic happens, because I have no photos of the layering/ironing/pinning process. It was not fun. I have decided that I will be a) serging the edges of all pieces of monks cloth; and b) basting them onto the lining. Otherwise, there are too many loose edges that don’t get caught up into the seams. In fact, if I serge the edges of the monks cloth—just now realizing this… doh…—I can just straight stitch the whole thing.
(Now I’m wondering if I need to back up and re-do my sashes…)
Here it is, unturned:
Again, Jobie is not allowed to comment.
And what does it look like when finished?
It really is pretty. But I think I’m going to remake them tomorrow.
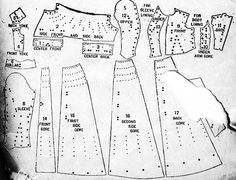
I went to draft the pattern for my skirt, and I knew that something about the topology of the waistband was not going to be right. I had been drawing it attached to the skirt itself, i.e., all one piece, just because I was hoping to have an easy job of it.
But of course—and especially given the redesign I had to come up with—the waistband had to be a separate piece.
The aforementioned redesign:
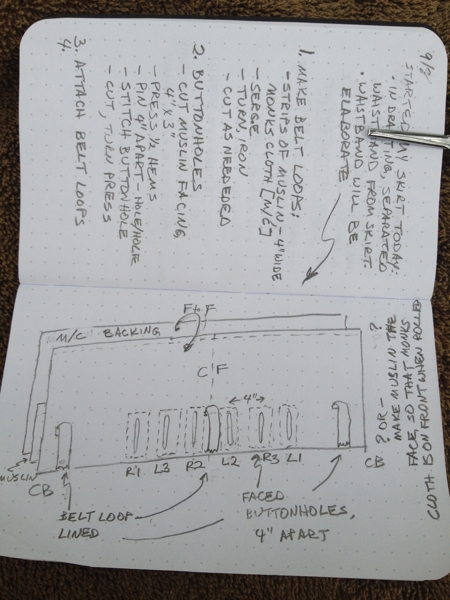
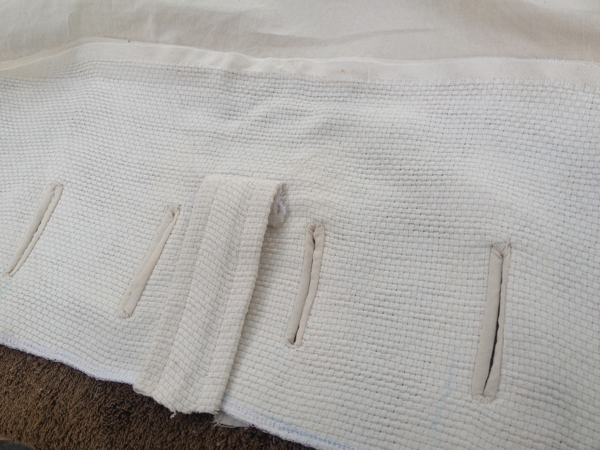
There will be two separate sashes (more about which tomorrow) that will be sewn into the two outer buttonholes, then weave their way across the front, go around the back through the belt loops, and back to the front, to be tied through the front loop.
So each waistband will have three belt loops, six faced buttonholes, and two sash halves.
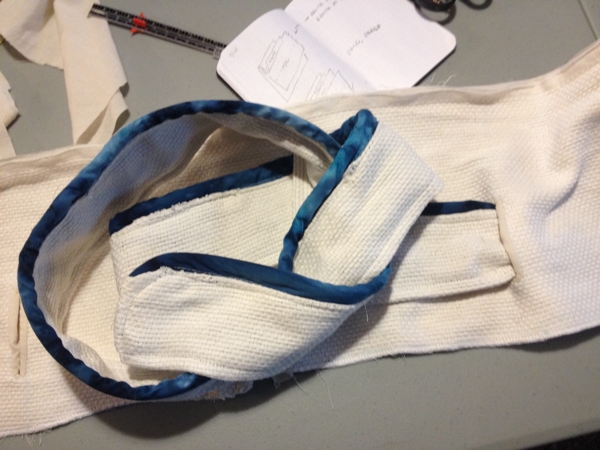
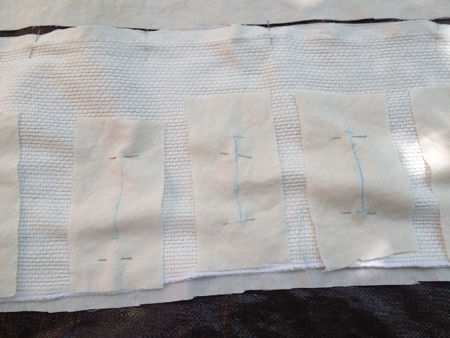
Here we go. First, the belt loops are lined with muslin for a little sturdiness. I’m making two huge lengths and then cutting off what I need. Here they are all pinned:
And heavens bless my old friend Stella Lang, who loaned me her serger for this project. Here’s the above edge all serged:
That may be hard to see, but with a fabric like monks cloth, serging is a must. Otherwise the stuff just unravels.
That tube now gets turned inside out, pressed flat, and topstitched on the sides:
I cut out 28 rectangles of muslin—planning ahead, since each skirt will need six, and there are four Old Men in the troupe. Marked them where the buttonhole will go, and positioned them on the waistband:
I feel like Marcel Duchamp, except that he had the luxury of randomosity.
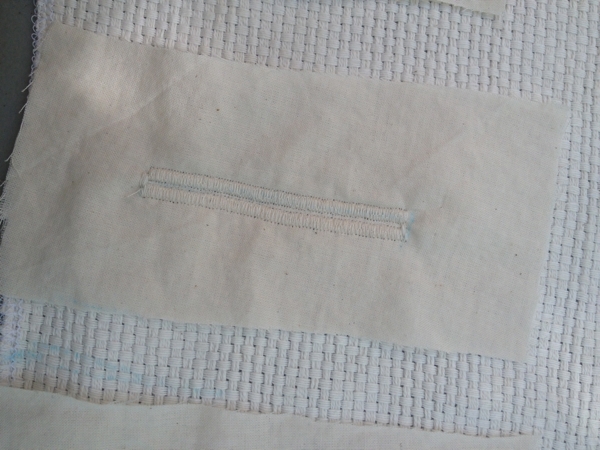
Those get zigzagged down and up: 1
Those get slit, and we add the belt loops:
Those facings get turned through to the back:
Tomorrow I will topstitch around the buttonholes, create the sashes, stitch those in, probably topstitch across the middle of the waistband, then add a backing layer of monks cloth.
Easy, right? And I only have to make three more!
—————
1 Actually, I should have just straight-stitched them in a rectangle around the cutline; it would have made for a tidier turn. But on the whole I’m going with overkill with this monks cloth.
Every morning I get up and walk two miles. This is because my doctor has gotten cranky in his old age. Part of the path I take is around the city park down on First Avenue, across the gully/railroad tracks from the theatre, going three times around the path.
It’s a lovely, open greensward, and lately part of its appeal is its unimpeded view of the sky. I realized this the morning after the recent Perseids meteor shower when I caught the last of the meteors flashing across the sky. I made a mental note for next time.
This past week I’ve been watching the conjunction of Venus and Jupiter on the eastern horizon, and since I’ve been reading Flat Earth, by Christine Garwood, it has been an amazing experience.
We have a couple of disparate threads here—I’ll try to keep it clear as we go along.
1.
First of all, Flat Earth is solidly researched and infuriating: no one after the Babylonians believed the earth was flat—you have been lied to every Columbus Day—but in the 1840s, after Darwin had published and scientists began establishing themselves both as a profession and as an arbiter of truth, there arose a countermovement which looks, unfortunately, very familiar to us here in the 21st century: the Zetetic Astronomy movement.
Zetetic came from the Greek philosophers, and the short version is that it meant you shouldn’t believe anything but your lying eyes. Earth looks flat? Then it is. Those “scientists” were just pointy-headed atheists who were trying to pry you away from God, who clearly said the earth had corners and pillars and that Joshua made the sun stand still which how could it do if the earth were moving anyway hernggh??
It is very distressing to read how all the pieces familiar to us today from the evolution wars were already in place: shyster pitch-men who may or may not believe what they’re selling to the rubes; the appeal to Scripture as an absolute truth; the scalding vituperation towards science and fact; and the refusal to countenance any evidence that contradicts the Holy Word of whoever it is that’s telling you that the Earth is Flat.
One bit of “evidence” that the zetetics found irresistible was that no sane person could possibly believe that we were on a globe rotating at 25,000 miles per hour, hurtling around the sun at 67,108 miles per hour. Any child could see how that was an insane lie: we’d all be flung from this supposed sphere into the skies.
Hold that thought.
2.
If you get to spend any time with the stars at night, one thing that impresses itself on you is how they’re always the same. Javert was right in staking his moral imperative on them; they never change. (The fact that his moral imperative was wrong need not concern us here.)
For the ancients, the stars loomed much larger, of course. Every night was a complete blackout for them, and the view of the sky every night was spectacular in a way that requires us to take trips to Monument Valley to see.
And every night, the stars were the same. You saw the same patterns, the same groups, the same brightnesses, every night. You could identify them. You would notice how they rotated around that one star, how as the seasons changed they shifted northward or southward, how the sun rose each morning in specific groups that marched along in an annual procession.
You would notice the regularity of it all, how the sun would rise a little earlier every morning, a little further north every day, until one day in June when it would “stop” and go back the other way.
And then in the winter, after its southward trek, rising later and setting earlier every day, the sun would reverse course and return us to spring. I think I would have started having a party every year that day or something. Maybe something with a lot of lights.
Anyway, it was always the same, a crystal sphere set with twinkling gems, eternal and flawless and unchanging.
Except for those seven stars.
3.
Look at this:
from the Astronomy Photo of the Day, NASA—do not click on the photo! Don’t do it!
[Disclaimer: I am in no way responsible for any time suck occurring because you clicked on that link.]
Here we have Venus (on the top) and Jupiter in what is called “conjunction,” and it is easy to see why. The photo is from the great site Astronomy Picture of the Day, taken on the isle of Elba on Monday, August 21.
Here’s what I saw last Friday, August 29:
This is what struck me like a ton of bricks: what a staggering thing to look up and see these stars that don’t behave. They are never where they were the day before, and you can see them change on a daily basis. The Greeks had a name for them: ἀστὴρ πλανήτης, “wandering stars,” astēr planētēs. Planets.
If you observed them carefully for a while, of course, you’d see that they too seemed to have regular paths and you could predict things like the conjunction of Venus and Jupiter, or when Mercury would stop in its tracks and retrace its steps across the sky for a while. Doing so required very complicated diagrams if you believed that everything orbited around the earth, which everyone did because NO ONE THOUGHT THE EARTH WAS FLAT, PEOPLE.
You may now insert paragraphs about Copernicus and Brahe and Newton. Blah blah science blah. Have some pictures:
Space is big. You just won’t believe how vastly, hugely, mind-bogglingly big it is. I mean, you may think it’s a long way down the road to the chemist’s, but that’s just peanuts to space.
4.
So here we are, on our morning walk, and knowing what we actually know about the universe and not what our lying eyes tell us, look up again:
Now we can see what’s going on here. Venus and Jupiter. We know that Venus is closer to the sun. We know that Jupiter’s diameter is actually 11 times that of Venus despite appearing smaller to our lying eyes. We know that’s because it’s gazillions of miles further away.
We know that each is heading its own way around the sun—Venus is going faster than we are, Jupiter slower.
And if we stand there and look at those two stars, we can begin to see that the reason they are getting farther apart every morning is that we are hurtling on our path between them at 67,000 mph. Jupiter is falling further behind to our right, and Venus is scampering on ahead on our left.
More:
See the line formed by Venus/Jupiter? That’s the ecliptic, the plane on which all the planets orbit the sun. (Pluto notoriously does not, but then… well, we know about poor Pluto, don’t we?)
Notice that it’s at an angle. A 23.5° angle. That’s how much the Earth is tilted from the perpendicular to the ecliptic. It’s what give us seasons; it’s why the sun moseys from north to south and back again, solstice to solstice. We’re tilted in space, and here we can see it.
So there I am, looking at these two beautiful points of light in the morning sky, and when I think through all of these things, I get a very very real sense of the ground beneath my feet moving at 25,000 miles per hour towards the rising sun, while tilted at a 23.5° angle, zooming towards and between those two lights through vast, empty spaces.
It is no wonder that our Flat Earth friends rejected out of hand these marvels—it’s so much safer to believe your lying eyes, isn’t it?
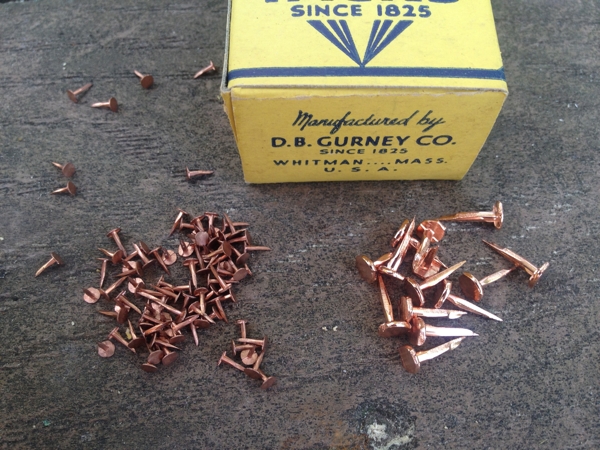
Here are today’s aesthetic materials: copper tacks. I found them online. First I ordered the ones on the left, but when they came they were so tiny that I feared they might not be sturdy enough to hold the lizard onto the staff. I then ordered the ones on the right, only to find once I had the lizard designed that they were too big.
Let’s pause for a moment and consider MOOP.
MOOP stands for Matter Out Of Place, and it’s a huge no-no in Burner Land. Out at Black Rock City, the federal Bureau of Land Management (BLM) allows the festival to leave behind one square foot of debris per acre; more than that, and the annual permit is not renewed. As you can imagine, BMOrg is very serious about the Leave No Trace principle.
The 3 Old Men experience was designed from the very beginning to be as MOOPless as possible. Originally, you may recall, it was just me, Craig, and David traipsing across the Playa in loincloths and staves. No MOOP at all to speak of.
When the labyrinth was added, MOOP was one of my overriding concerns: it all comes out of a crate, gets set up, and all goes back into the crate. No fiddly bits, no moving parts, no feathers, no sequins. No MOOP.
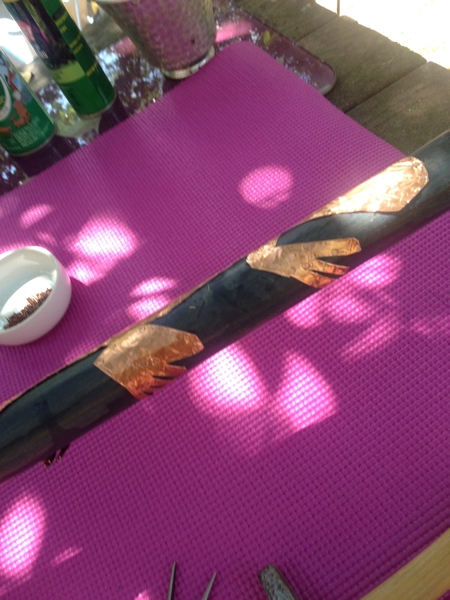
So here I am about to use these tiny little copper tacks to affix my lizard, and all I can think of is that these little buggers are just MOOP waiting to happen, if they don’t hold. And while out at the Playa it might be perfectly easy to sift the dust to find them, somehow I’m thinking that the farmland of Alchemy might be more of a challenge. Spoiler alert: they seem to be working just fine.
The little tacks are pure copper; the larger ones are copper-plated steel or zinc. This means the little ones are a lot softer than the big ones, and a little experimentation showed that it would be more efficient to pre-punch holes in the lizard, especially at the folded-under edges:
And here we are, all punched and ready to go.
I had the presence of mind, two or three sessions ago, to mark the correct position of the lizard with little dots of magic marker, and they still showed through the blue stain quite well. (The cerise surface is a yoga mat, which is sitting on a towel. This cushioned the staff against scratches as I tapped tacks in.)
The first tack:
And done.
In the process, about an eighth of the tacks bent or otherwise failed and had to be discarded. Since there are about 1,000 tacks in the box, I was profligate in my rejection.
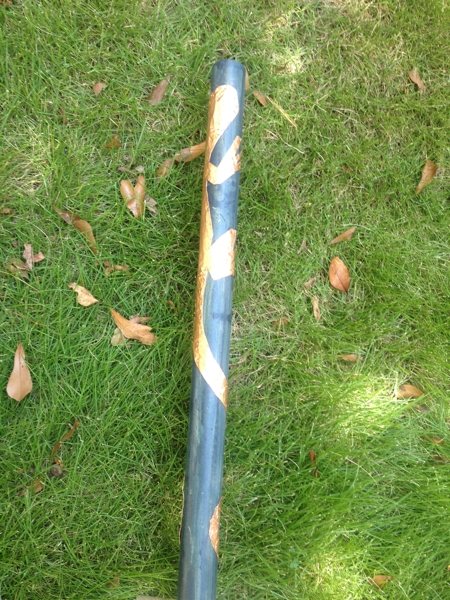
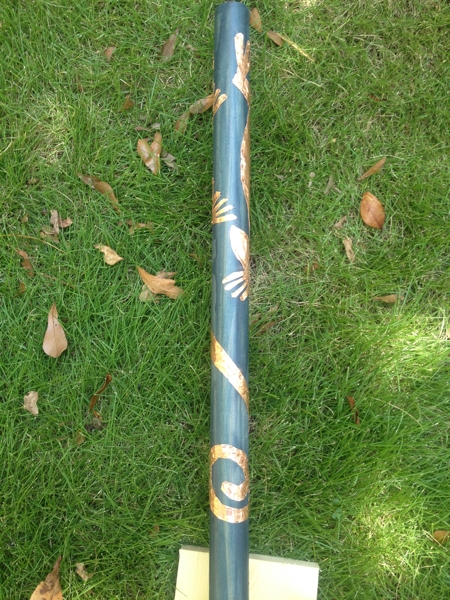
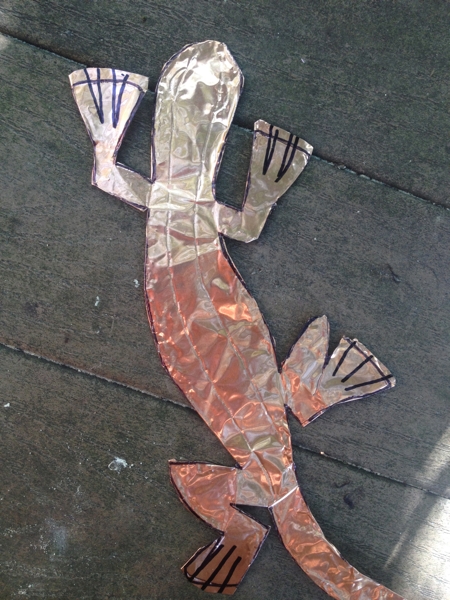
Here’s what it looks like.
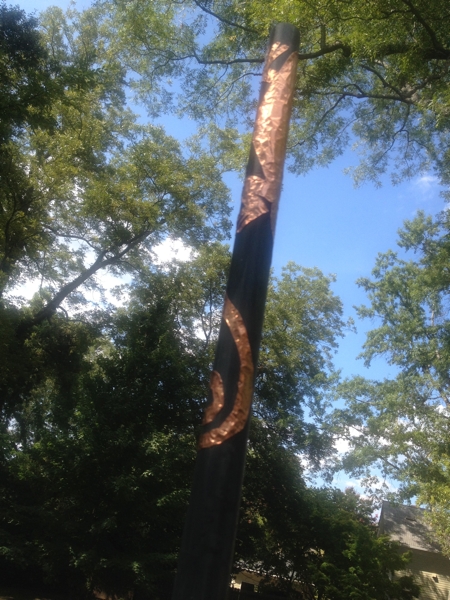
And in its natural habitat, i.e., raised aloft:
I will now let it sit there and annoy me for a month or so. I really think I need to make the eyes and the stripe more more somehow. Remember that the ritual will often take place at night, and so more definition of those details might be important. I don’t know.
Also, I keep thinking that I can/should use some of the remaining tacks to create more decoration on the staff: lines, swirls, waves, etc. Something along these lines, perhaps. But all those tacks… the specter of MOOP haunts me…
I recently renewed my membership in the American Composers Forum and immediately began looking over the Opportunities available to members.
So far today, I have submitted the following:
Fresh Squeezed Opera Company: They were looking for new arias, etc., so I submitted “My mother, bored and pampered,” promising to orchestrate it for their small ensemble if they select it.
Denison University Tutti Festival: I submitted two works, the Pieces for Bassoon and String Quartet, and “Blakes Leads a Walk on the Milky Way.”
I’m also considering inquiring about the Sacramento State University’s odd little posting about premiering works and students studying the history of such premieres. I mean, why not? Who says I can’t whack out a new piece for chorus and small ensemble by “early November”?
I’ll keep you posted about further submissions as I continue to explore the Opportunities.
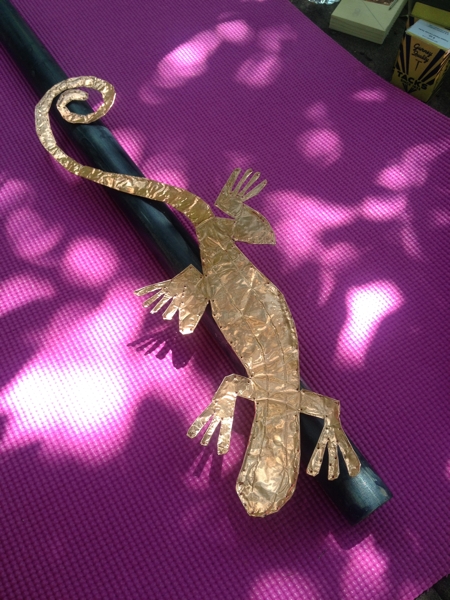
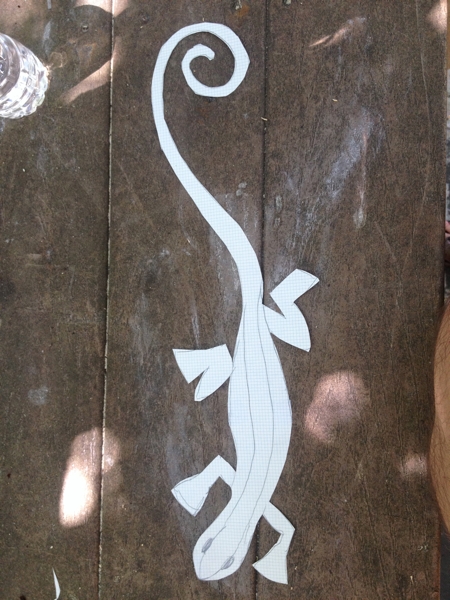
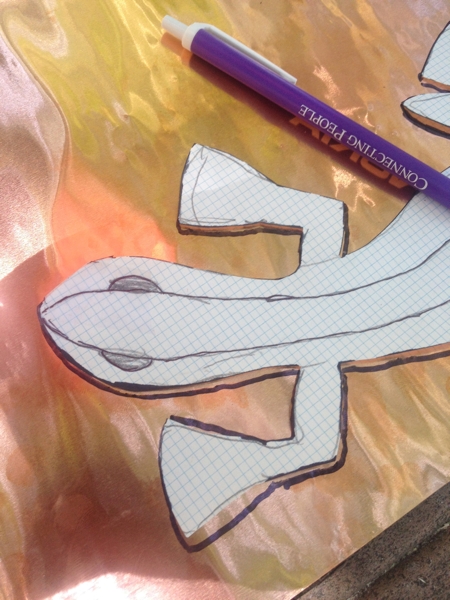
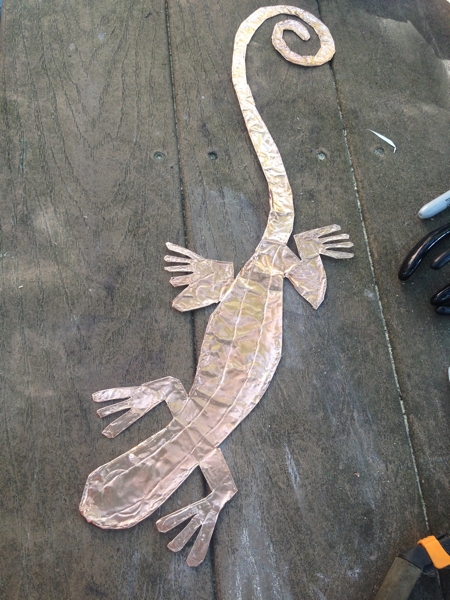
Nearly there! Yesterday was the most nerve-wracking of the construction steps for my staff, since the lizard is the main design element and I was fearful of “messing it up,” a perfectly meaningless concept of course. But still.
Here is the design:
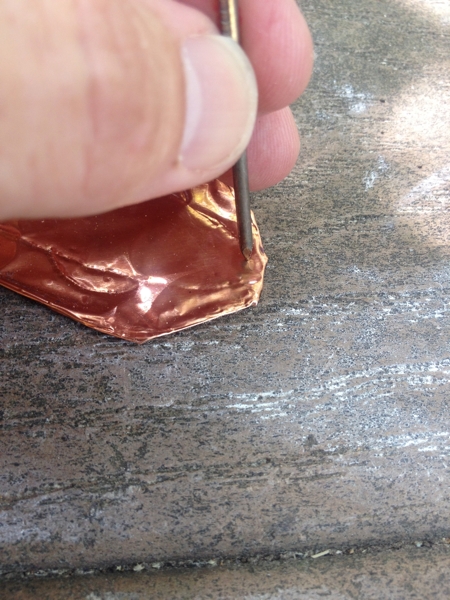
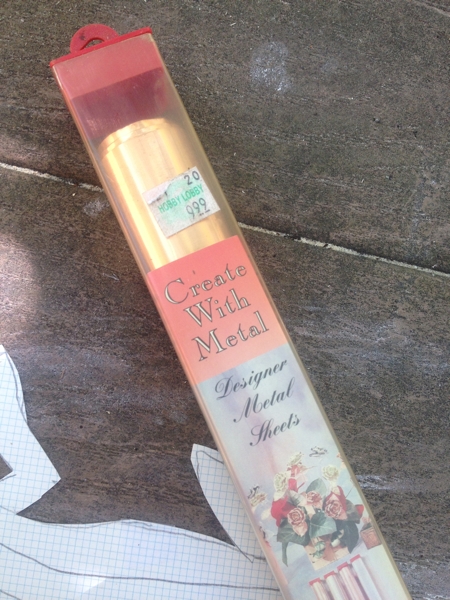
It will be made from copper sheeting, which I just happened to have lying around.
I would like to point out that I bought this from Hobby Lobby years ago, before they revealed themselves to be Dominionists of the worst sort.
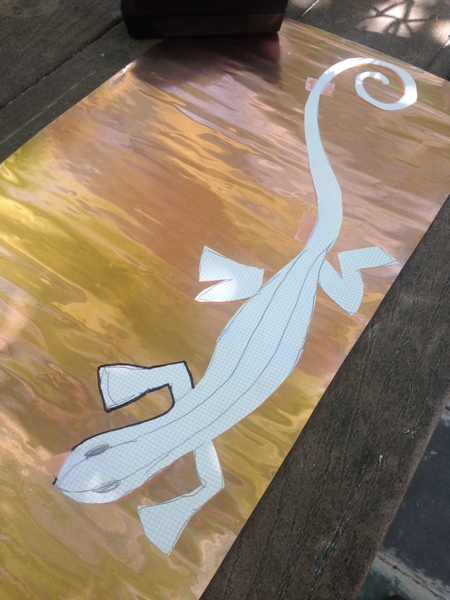
All laid out and ready to go:
After outlining the design in marker, I went back with a ballpoint pen and traced the center stripe and the eyes, embossing it into the copper.
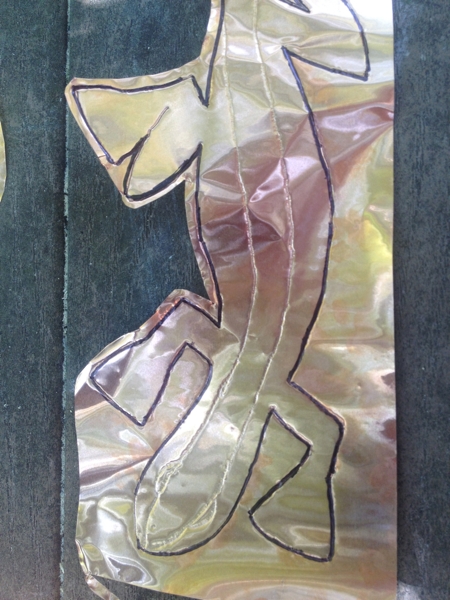
Halfway cut out.
Notice that I leave a margin around the outline. This is because there may or may not be intoxicated individuals near the staff, and I’m thinking that SWIM[1] would be loath to seek medical attention if my their hand were sliced open by sharp lizard edges—so I designed it to have a turned-under edge.
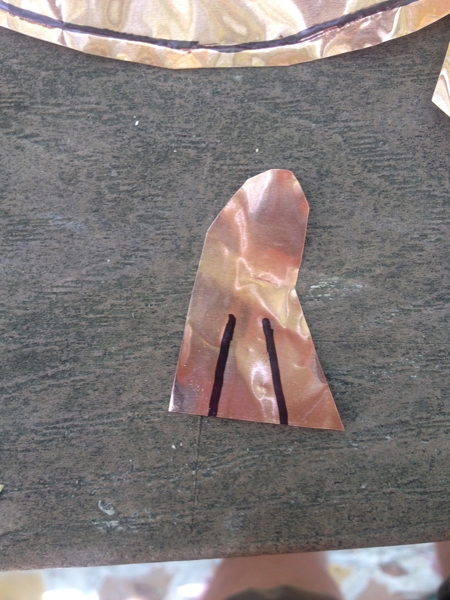
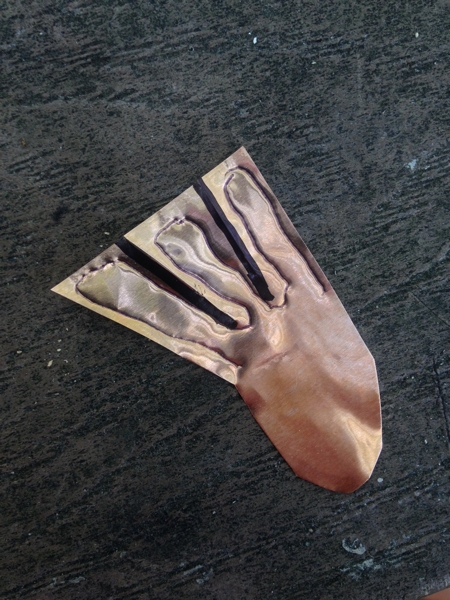
You may have noticed that the feet seem to be simple, spade-shaped affairs. Not so: they will be clever little lizard fingers, but I was concerned about how best to make those. Therefore, a test foot:
After marking them, I embossed the outline of the fingers, thinking that would make it easier to turn the edges under. As it turned out, that step was not necessary.
The finished fingers looked very nice I thought.
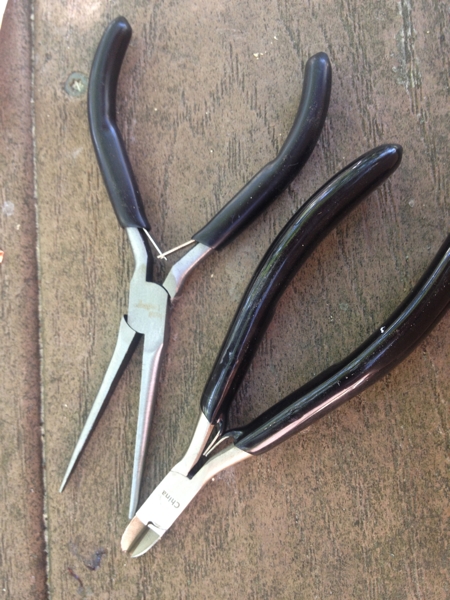
I will say at this point that the proper tools—which we have discussed previously—are always a blessing, and turning under a small band of copper like this necessitated a trip to Michaels, where I bought some jewelry-making tools:
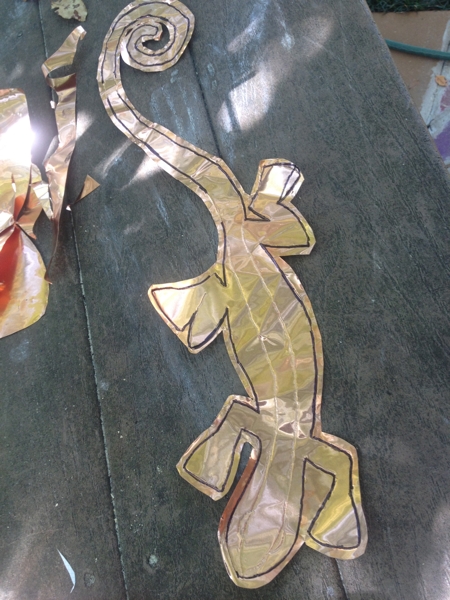
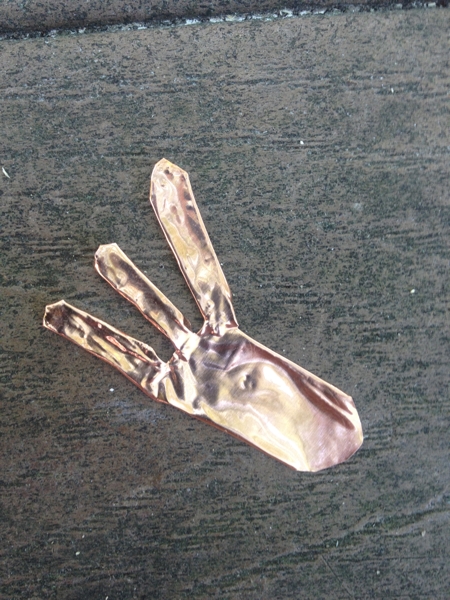
The super-thin needlenose pliers were particularly and spectacularly helpful. Here’s the beast all turned under except for the fingers:
And here he is all done.
The final phase is to attach him to the staff. I say “final,” but there are other options to think about: does he need jeweled eyes? Also, I have in mind that it might be necessary to further decorate the staff as a whole… well, you’ll see.