Morning report:
After a couple cups of coffee, I toddled down to the ceramics studio to work on my mug. You will recall, perhaps, that my decorative goal was to replicate the stone carving labyrinth on the side of the mug.
In the previous two versions of the mug, I went ahead and carved the labyrinth while the clay was still moist and workable. This didn’t work as well as I had hoped, because in the course of finishing the mug, I’d mush the labyrinth a bit and have to re-carve parts of it on a regular basis. So yesterday I decided to let it dry a bit and then carve the labyrinth. This morning seemed the opportune time to get it done.
The mug had completely set up, so there was no question of messing it up by handling it. I grabbed my little tools and a water spray bottle and got to work.
Here’s what I found interesting: whereas previously I just scooped out the wet clay, now I was actually having to carve the path of the labyrinth into the dry surface. I had to proceed slowly so as not to break the path outlines, and although I could wet the surface to make it a little easier, I was still scratching a little bit at a time. And that was more or less what the original artist/priest/person did on the prehistoric rock carving from Spain.
Another difference was that in the wet clay I was able to draw out the entire labyrinth and then follow the path. In the dry clay, I had to plan how to scratch the paths so that they hooked up and flowed correctly. I ended up drawing it on a piece of paper and shading in the paths I had done.
I started in the center with the round mound and proceeded outward. It was interesting that after I got the first three rounds done, I began to realize that the figure was placed so high on the mug that I would run out of room for the last four rounds. So, just like the prehistoric artist before me, I had to make the last four rounds a lot thinner than the rest of the course. I went ahead and scratched in those four thin lines at the top; that made sure that everything cohered and jumped.
The bottom part was another challenge. One reason I chose this particular petroglyph as a tattoo was its solution of the opening of the labyrinth: a rather phallic entrance area, flanked by a squarish area (with a breast-like engraving in it) and a semicircular area. As I approached that area, I wished I had printed out a copy of the thing to bring with me so I could approximate it as closely as possible.
Then, of course, it dawned on me that I had a copy on me. Literally. I just pulled up my shorts and studied my upper thigh. Should have done it sooner, because the balance of the thing that appeals to me so much relies on a specific shaping of the courses, but you know what? This one is mine.
Here’s a photo:
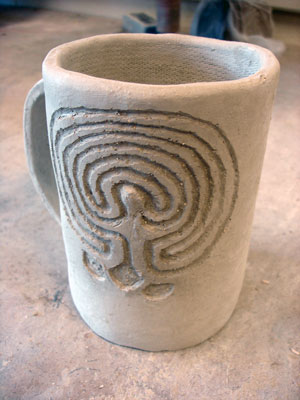 It has to be fired, which will shrink it a bit more, and then glazed. I’m thinking a dark greenish glaze, if one is available.
My only concern at this point, other than hoping I got the clay right throughout so that it doesn’t blow up in the kiln, is that the etching is deep enough for the labyrinth to show up through the glaze. I’m pretty sure I’m going to lose the dot and line in the bottom left area. Maybe I can paint that one with glaze. I’ll check with Andy.